

Easy Chicken Pastelillos (Empanadillas) - From Scratch
- Jeff & Jo's
- Jul 9, 2020
- 5 min read
Updated: Jul 16, 2020
Fried food is such a staple of Puerto Rican cuisine. I remember going to my grandpa's cafe in the morning and eating a delicious chicken pastelillo or beef pastelillo right out of the fryer for breakfast. Nothing like that crispy and flaky dough filled with your favorite savory filling.
Over the years, most people just buy pre-made pastelillos (or empanadillas as they call it on the west side of the island) and if they decide to "make" it then they use pre-made dough that is sold in most grocery stores in discs already. However, there is nothing like fresh, 100% made-from-scratch pastelillo so we want to show you how to make it. It is much easier than you think!
Ingredients:
Dough
3 cups flour
6 tbs shortening, chilled
1 tsp salt
1 c ice water
Filling
2 lbs chicken breast
1 cup water
1 bunch of cilantro
1 red onion
1 green bell pepper
5 cloves of garlic
2 roma tomatoes
1 tbs adobo
½ tsp white pepper
½ tsp cumin
1 tbs achiotte oil
2 tbs butter
3 sprigs of fresh thyme (optional)
Let’s start by preparing our pastelillo dough, since it will need to rest for about one hour in the refrigerator. In your food processor, combine your flour and salt. Then add your chilled shortening and blend until it forms the consistency of loose sand. It’s important to chill your shortening before adding, because this helps prevent it from melting while you are working with it, resulting in a flakier pastelillo. If you don’t have a food processor, you can use a pastry knife or a fork to cut in the shortening. That said, I have had the best results with a food processor, which is why I’m using that method here.

Once blended, dump your flour/shortening mixture into a bowl and slowly add one cup of ice water, little by little, until it forms a loose dough. Again, it’s important to use ice water, as we want to keep the dough as cold as possible, to prevent the shortening from melting. Depending on your flour, you may need to add a couple tablespoons more or less of water. Just keep adding until the dough sticks together.
Once your mixture starts to form a dough, turn it out onto a clean surface and knead it until the liquid is evenly distributed. Be careful not to over-knead it though, as it can make the dough tough. The dough should be tight, yet flaky, and have the consistency of pie crust.

Now shape your dough into a rectangle, and cut it into 16 roughly-even pieces. Loosely shape each piece into a ball, and transfer them to a clean plate. Once shaped, cover the dough balls with plastic wrap, to lock in the moisture, and let them rest in the refrigerator for 1 hour.
While your dough is resting, let’s make our chicken filling. Start by dicing your veggies. Your tomatoes, your onions, your peppers, your garlic, and your cilantro. Once your veggies are prepped, add them to your instapot, and then add the rest of the ingredients, including your achiote oil, your butter, your adobo, your white pepper and cumin, and your thyme leaves. Then go ahead and add your chicken breast on top of your veggies. Adding your chicken on the top ensures that it won’t stick to the bottom and burn. Then add a cup of water to the instapot and put on the lid. Since we want this to cook quickly, we are going to set the vent option to “sealing,” so the instapot acts basically like a pressure cooker. Now turn it on to the “meat/stew” setting for 30 minutes.

At the end of the thirty minutes, open the vent and release the pressure in the instapot. Once you can take off the top, the chicken should be thoroughly cooked and soft enough to shred it with a fork. Go ahead and shred the chicken, then turn your instapot back on for another 15 minutes, without the top on. This is just to boil off some of the liquid.

Now back to the pastelillo dough.
After the hour is up, take out your dough balls and flatten them into discs, about 6 to 8 inches wide. There’s no one right way to roll out the dough balls so I’ll show you a couple of ways. First, a lot of people like to put the dough between layers of wax paper and roll them out that way. This makes clean up easy, but can be a little unwieldy since the wax paper might slide around on the table.

If you are going to use the wax paper method, I found that first using a flat pyrex to flatten our ball of doughs is a good start, and makes it a little easier to get a nice round shape.
If you aren’t a fan of the wax paper, you can also just roll it out on a clean surface. Your dough shouldn’t be too sticky, but if it is, consider adding just a little bit of flour to the surface, to prevent it from sticking.
After your discs are formed, move them to a clean plate and layer them with additional wax paper, to prevent them from sticking to each other.
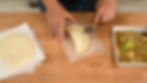
By the time all your discs are shaped, your chicken should be cooled down enough to handle, so let’s go ahead and put together the pastelillos. Place your disc on a flat surface and add about 3-4 tablespoons of the chicken. Make sure to shake off any excess liquid from your chicken as you add it.

Once your chicken is in place, fold over your pastelillo dough, to form a half moon shape. Then press down on your empanadilla to remove any air trapped in the filling and to seal the edges.
Finally, use a fork to crimp the edges, working your way around the whole edge, on both sides of the pastelillo. Now repeat this process with the rest of your dough balls.
Put down your disc, add your filling, press out any excess air, and then seal the edges.
Now I typically use a fork to seal the edges of my pastelillos, it’s also very common to roll the edges closed. This is the way it’s typically done for larger pastries, and makes it much more likely that someone will call them an empanadilla, or an empanada.

To make this shape, after you’ve folded your dough in half, roll the edges back towards the center of the dough and then use your fingers to pinch the dough together, forming a series of bumps around the outside edge. Make sure to pinch firmly, so the dough doesn’t come apart as you are frying it.
Once all of your pastelillos (or empanadillas, or empanadas, or pastelitos… whatever, you get it)... once they are all shaped, let’s go ahead and fry them. Add enough oil in a large pot to completely cover your pastelillos and heat it up to 350 degrees fahrenheit.
Once hot, add your pastelillos to your oil--they should immediately start bubbling. If not, the oil’s not hot enough yet. Then go ahead and fry your pastelillos.

I like to flip my pastelillos throughout the frying process, in order to ensure an even cook. Also, because it ensures that both sides of the pastelillo stay hot throughout the cooking process, it minimizes the absorption of oil.
Cook your pastelillos until they are a golden brown on both sides and then remove them and place them on a plate lined with paper towel.
Once cool enough to handle, dig in!
Check out our instructional video, showing how to make this recipe step-by-step HERE.